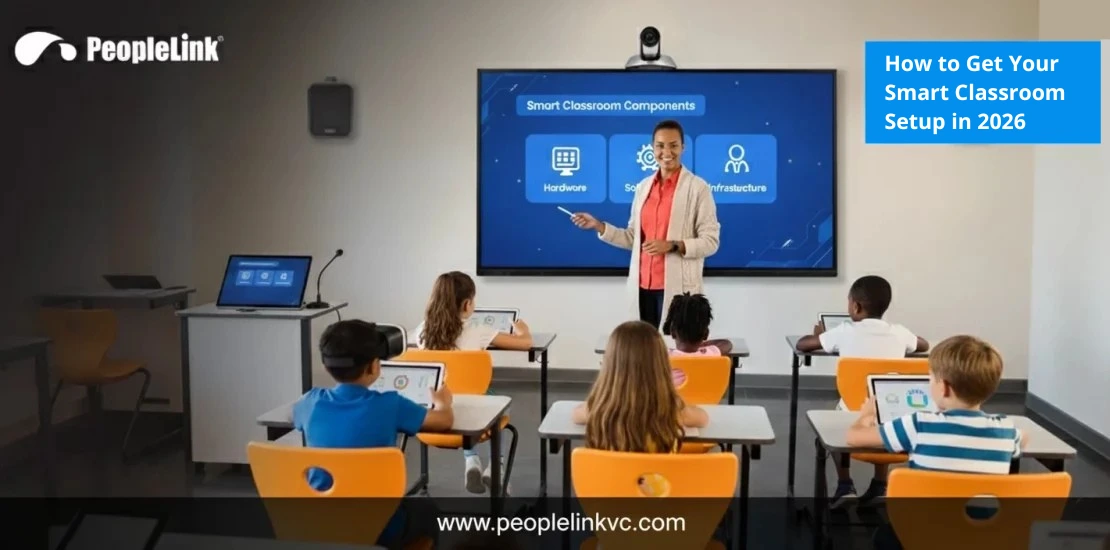
How to Get Your Smart Classroom Setup in 2026
- September 25, 2025
- Posted by: Meet Shah
- Category: Blogs
If you’re planning to set up a smart classroom in your school or university, then you’ve come to the right place.
You already know that a smart classroom is an important project, but it can be complicated to set up. You may be overwhelmed with a lot of questions, such as what to buy, how much to budget, and how to manage the installation without disrupting classes.
You want simple answers. And that’s exactly what this guide provides. In this guide, we’ll cover the A-to-Z of everything you need for a successful smart classroom implementation in 2026.
Is Setting Up Smart Classroom Solutions Worth the Investment?
Everywhere you look in 2026, the hot topic of the conversation is about the benefits of technology in education. You keep seeing people repeating traditional methods of learning are no longer enough, technology is transforming education, and schools need to keep up.
But just because everybody is upgrading the learning environment in the classroom, does that mean you have to do it? Does it really worth the money to invest in building a digital classroom setup?
The answer is yes, but only if you focus on the right outcome.
Here’s the biggest reason to invest: A smart classroom transforms the very nature of teaching, shifting the focus from cost of equipment to a “Return on Instruction”.
Think about it. The core of educational teaching is about connecting with students, but in a traditional classroom, educational tools are limited, making it difficult to track every student’s progress in real-time or adapt lessons for different learning styles.
But a smart classroom offers the tools to change that. It creates an environment for active, engaging, and customized learning through better class activities.
In fact, studies show that the interactive nature of smart technology grabs students’ attention, making them more willing to engage in learning for longer periods.
What Goes into a Smart Classroom? The Essential Components
To build your smart classes, the first step is understanding the key components that make it work. We classify technology in classrooms into three main categories. Let’s break down these three categories to see what you’ll need for your classroom.
1) Must-Have Hardware:
This is the tangible smart classroom equipment that your teachers and students will interact with on a daily basis.
- Video System: To support modern learning, you need a high-definition camera that can move (pan, tilt, and zoom). This is important for keeping remote learners engaged.
- The Interactive Display: Interactive Flat Panel (IFP), often called a smart board for the classroom, is a high-definition, multi-touch display that replaces the traditional chalkboard or whiteboard.
- Audio Systems: If you are planning to support remote or hybrid learning in your classrooms, then clear sound is non negotiable.
- Smart Digital Podium: This device consolidates everything they need into one simple, organized station, allowing them to run the class with confidence.
2) Must-have Softwares:
- LMS – An LMS is the central hub where teachers can share course materials, collect assignments in one place.
- Collaboration tools: You need these tools in classrooms so that your teachers and students work together on important tasks in real time.
- Video Conferencing Platform in Classroom: These platforms enable reliable remote connectivity in your classrooms.
3) Must Have Modern Infrastructure
- High-Speed Internet: You need a Wi-Fi network with enough bandwidth to support dozens of devices streaming and collaborating at the same time.
- Uninterruptible Power Supply (UPS): You need a UPS that protects your significant investment in sensitive electronic equipment from power surges and prevents a loss from being disrupted by an outage.
- Network Security: You need strong firewalls and content filtering to protect students, as well as measures to safeguard private student data from potential breaches.
How Much Does a Digital Classroom Setup Cost? A Realistic Budget Guide
A smart classroom setup is a significant investment, and creating a realistic budget is one of the most critical steps in the entire process. The good news is you can make an incredible learning environment without needing the most expensive equipment on day one.
This Sounds Expensive. Can I Justify This on a Tight Budget?
Absolutely. While the initial figures can seem high, the investment is manageable even for schools with tight budgets, especially when you think strategically. Here are a few proven strategies:
- Start Small and Scale Up: You don’t have to upgrade every classroom at once. Begin with a pilot classroom to prove the concept and demonstrate the benefits, then expand as more funding becomes available.
- Look for Grants: Many government and private grants are specifically available to help schools cover the cost of technology.
- Choose Multi-Purpose Tools: Instead of buying separate devices for different tasks, look for all-in-one solutions that combine a display, interactivity, and teaching tools to maximize value.
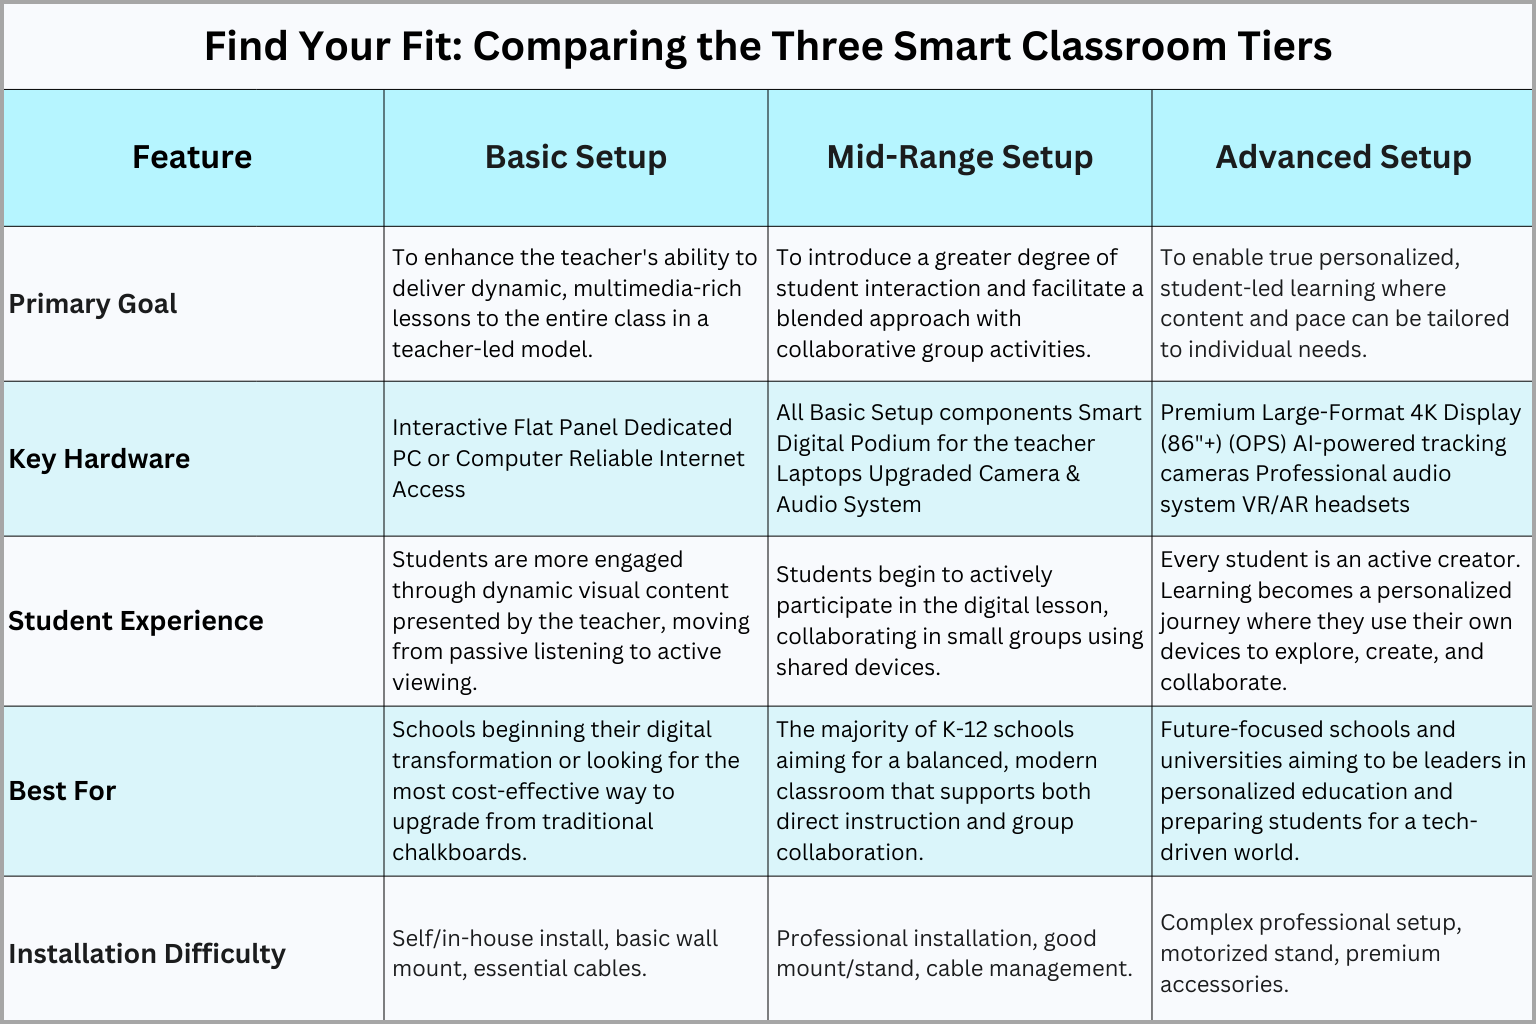
Tiers of Implementation: Which One Fits Your School?
- The Basic Setup: This basic setup provides teachers with essential tools to move away from traditional chalkboards and create engaging, multimedia lessons for the whole class. It offers a cost-effective way to start using smart learning. The setup includes a standard 65-inch Interactive Flat Panel, a simple computer to run it, and the necessary installation.
- The Mid-Range Setup: This is the most common and recommended setup for K-12 schools. It builds on the basic model by adding better audio-visual equipment. It includes: A larger, higher-quality 4K Interactive Flat Panel (75-inch is the standard), a more powerful PC or an integrated OPS module, a high-definition camera and microphone system, and a set of shared laptops or tablets for student group work.
- The Advanced Setup: This represents the most advanced model, designed for truly personalized learning. In this setup, every student has their own device and the lessons are tailored to individual needs. It includes: A premium, large-format 4K Interactive Display (86-inch or larger), a Windows computer (OPS), advanced AI-powered cameras that can track the teacher or students, a professional audio system with ceiling microphones, and a 1:1 device program for every student.
Beyond the Price Tag: Understanding the Total Cost of Ownership
One of the biggest mistakes most schools or universities make when they are building their smart classes, is that they only think about the initial purchase amount. Most people don’t know that their is a difference between initial cost and a Total Cost of Ownership.
TCO is all the cost they have to pay in order to keep the classroom system running over the upcoming 3-5 years. Here are a few examples:
- Teacher Training: Your budget must account for initial training, ongoing coaching, and continuous professional development to ensure the technology is actually used effectively.
- Software Licenses: When you buy software to help with your online classes, you will need to pay for a subscription each year. This means you’ll have to pay a fee every year to keep using the software.
- Maintenance & Support: After the standard 2-3 year warranty expires, you’ll need an Annual Maintenance Contract (AMC) for support and repairs. A basic AMC can start around ₹18,000 per year and is a critical investment to protect your hardware.
- Future Replacements: All technology has a limited life. Laptops and tablets typically need to be replaced every 3-5 years, while displays can last 5-8 years.
Best Way to Buy Smart Classroom Technologies
For most schools, especially those with limited IT staff, a bundled, turnkey solution is the best option if you want the best results for long term. It ensures you get a cohesive system that is fully supported from day one. In this approach, you partner with a single company that provides a complete package, including all hardware, software, installation, and training. Although this way, you may have less flexibility to pick and choose “best-in-class” components for every single item, you will get one point of contact for all support issues, which eventually makes the management of setup simpler and easier.
The Setup Process: A Step-by-Step Guide to Installation
Once you’ve chosen your components and set a budget, then comes the 3-step installation process.
Phase 1: Pre-Installation: This is the most foundational phase that happens before any hardware arrives, and is the single most important factor for success. In this phase, your partner conducts a thorough Infrastructure Audit of your classroom. This includes checking the walls, assessing the room’s acoustics, testing the electrical outlets, confirming the Wi-Fi signals, and everything else. Once done, they help you create a Detailed Room Plan to show you the exact placement of the display, cameras, microphones, and speakers in your classrooms.
Phase 2: Physical Installation & Technology Integration: Then comes the installation part. In this phase, Trained AV technicians physically install all the AV Components, like the camera, speakers, and microphones, in their pre-planned locations. This also includes installing all necessary software and drivers on the main computer, configuring the Learning Management System (LMS), and connecting everything securely to your school’s network.
Phase 3: Technical Setup and Testing: Finally, the team verifies that the fully functional, integrated system they have set up is working correctly. In this phase, a pilot group of your teachers generally tests everything. They should run through a mock lesson to test every function to catch any bugs or usability issues before the classroom goes live.
After the Install: A Plan for Long-Term Success
Many schools and universities believe that once the setup is complete, the new smart classroom is fully operational. However, the long-term success of this investment relies entirely on what follows.
Training the Teacher for Adoption
The most advanced technology is useless if your teachers aren’t confident using it. Once the system is in place, you must provide effective training to your faculty members so that they adopt and embrace new tools, exploring new methods and strategies for effective teaching. The goal is to build basic confidence so a teacher can walk in and start a lesson with the push of a button.
A Plan for Support & Maintenance
Your smart classroom is a significant asset, and like any valuable asset, it requires a plan to keep it running smoothly and protect it for the long haul. Always remember that your smart classroom is built on technology. And technology has a limited life. You must do something to keep its life cycle in check. Here are a few things you can do:
- Build a multi-tiered support system for your ongoing technical problems. This includes your tech-savvy teacher, your in-house IT department, and the vendor support team.
- To handle equipment breakdowns, purchase an extended warranty to cover the device for up to 5 years.
- For support after the warranty expires, an Annual Maintenance Contract (AMC) is a must. Your AMC should define a clear Service Level Agreement (SLA) that guarantees how quickly a technician will respond or be on-site if there’s a major problem.
Final Thoughts on the Smart Classroom Build-Up
Transforming your learning environment with a smart classroom setup is one of the most impactful decisions you can make for your school. While it is a significant undertaking, this guide has simplified the process for you. You have the information that will help you prepare students for the world of future tech education.
Take the Next Step With PeopleLink
But you don’t have to do it alone. PeopleLink is an end-to-end provider of Smart classroom solutions with over 18 years of experience in designing and deploying successful smart classrooms for schools and universities. Our team of experts can help you at every stage, from initial consultation and custom design to professional installation and comprehensive teacher training.
FAQ's
What is a smart classroom?
A smart classroom is a traditional classroom but upgraded with smart classroom solutions to make the teaching and learning more interesting and dynamic.
What features make a classroom smart?
The main features include an interactive display, audio and video equipment for remote learning, educational software, and a reliable internet connection.
How do smart classrooms improve learning?
They improve learning by making lessons more visual and interactive, which increases student engagement and helps them understand concepts better.
What are the benefits and disadvantages of smart classrooms?
The main benefit is increased student engagement, while the biggest disadvantages are the high initial cost and the need for teacher training.
What equipment is required for a smart classroom?
The essential equipment is an interactive display, a computer, a camera, and a microphone system for audio.
Do teachers need training for smart classrooms?
Yes, teacher training is absolutely essential. The technology is only effective if teachers are trained and feel confident using it.
Can smart classrooms work without internet?
No, a smart classroom needs a reliable internet connection to function properly. Most of its collaborative and online tools will not work without it.
How do smart classrooms support hybrid/remote learning?
They support remote learning by using cameras and microphones to connect students at home directly to the live classroom, allowing them to see, hear, and participate.
What challenges are faced in smart classroom implementation?
The three main challenges are the high cost of equipment, the need for continuous teacher training, and overcoming potential technical issues.