How to build a Professional Home Video Conferencing Setup
- November 10, 2025
- Posted by: Damanjeet Kaur
- Category: Blogs

A professional home video conferencing setup is a complete system of dedicated tools that work together to make you look and sound clear, confident, and professional. It’s the intentional upgrade from using a laptop’s default built-in parts, which are often not good enough for important meetings.
This article is your complete overview of how to build that setup. We’ll cover everything you need to know about building this setup from your home. You will learn how to create a system that empowers you to communicate with confidence in every meeting.
Understanding Your Home Environment Setup
The most important step in creating a professional video setup is to understand your unique home environment first.
Your home is not a dedicated meeting conference room, and it was never designed to be one. A corporate meeting room setup has controlled acoustics and lighting, but your home setup is almost always a shared space. It might be a bedroom, a living room, or a kitchen table. These spaces are designed for comfort, not for audiovisual performance. Because of this, they present two main challenges that you must learn to control:
- Sound: The main sound problem in a home setup is echo. Your voice travels from your mouth and bounces off to all flat surfaces in your room. This includes your bare walls, your hardwood or tile floor, and your windows. When your microphone picks up your voice, it also picks up all of these bounced-back reflections. This is what creates that hollow sound that makes you hard to understand.
- Light: A home environment rarely has consistent lighting of an office. Instead, it has a mix of different light sources. This mixed light confuses your camera. Because of that, your face looks dark and shadowy while the window behind you looks bright white.
The good news is that you can make simple changes to fix these problems. Unlike corporate conference room solutions which are complex and fixed, you have full control over your home space. All you need is proper knowledge on building a truly professional setup.
Six Reasons Your Home Setup Is Failing (And How to Fix Them)
If you feel your current video setup is not providing the best online conference meeting experience, you are not alone. This is a common frustration for people working in a home environment. Let’s look at the most likely reasons your setup is holding you back and the simple path to fixing it.
1. Maybe your camera angle is too low
This is one of the most common issues. You are likely using your laptop as it sits flat on your desk or your lap. This position forces the built-in camera to look up at you from a low angle. This view is unflattering and can feel unprofessional in a meeting. It does not feel like a natural, face-to-face conversation.
The Solution Path: The goal is to get the camera to the same level as your eyes. You need to raise your laptop or camera to create a direct, straight-on angle. This simple change immediately makes your presence feel more professional and engaging.
2. Maybe your lighting is working against you
You might be relying on whatever light is already in your room. In a home, this is often a single light on the ceiling or a bright window. If that window is behind you, your camera sees the bright light and turns your face into a dark shadow. If the light is only from above, it casts harsh shadows under your eyes.
The Solution Path: The solution is to control your light. You must make sure your main light source is in front of you, shining on your face. This one step will do more to improve your video quality than buying a new camera.
3. Maybe you are using your laptop’s built-in webcam
The small camera built into your laptop is not designed for high-quality video. It has a very small lens and sensor. Because it is so small, it struggles to capture a clear picture in average home lighting. This is why your video may look grainy, blurry, or have strange, unnatural colors.
The Solution Path: The long-term solution is to use an external webcam. A separate video conference camera is a purpose-built tool. It has a much better lens and sensor, allowing it to capture a sharp, clear, and color-accurate image even in a normal home setting.
4. Maybe you are using your laptop’s built-in microphone
Your laptop’s microphone is usually just a tiny hole near your keyboard. This spot is very far from your mouth. To pick up your voice, the microphone has to be very sensitive. This high sensitivity is why it also picks up every other sound, including the echo bouncing off your walls and the sound of your own typing. This makes your voice sound distant and unprofessional.
The Solution Path: The solution is to get the microphone much closer to your mouth. When the mic is close, it can focus only on your voice and ignore the room’s echo. You can do this with a headset or by adding a dedicated external microphone to your desk.
5. Maybe you are using your laptop’s speakers for audio
This is a common cause of echo and feedback that ruins your conference audio. When you use your laptop’s speakers, the sound from your meeting plays out loud into your room. Your sensitive, open microphone (from the last point) then hears that sound and tries to send it back to the other people. This creates the painful, whistling feedback loop that forces everyone to mute.
The Solution Path: The solution is to stop the audio from playing in the open room. You need to use headphones or earbuds. Using noise canceling headphones is even better, as it sends the meeting sound directly to your ears, so your microphone can never hear it. This one fix instantly solves most echo problems.
6. Maybe your background is too distracting
Your home environment is full of your personal life. Your background might include a busy kitchen, a cluttered bookshelf, or people walking by. This movement and clutter pull attention away from you and your message. It can make it hard for others to focus and can feel unprofessional.
The Solution Path: The solution is to create a clean, simple, and non-distracting background. You can do this by finding a simple corner with a blank wall. You can also position your desk in front of an organized bookshelf to create a professional-looking space. A clean background keeps the focus on you.
What Components Do You Need for a Professional Conference Call Setup?
A great video conferencing setup is an ecosystem. It’s like a personal VC system, where four parts work together to create a flawless experience. These parts are your hardware, your lighting, your internet connection, and your software. Let’s look at each component in more details:
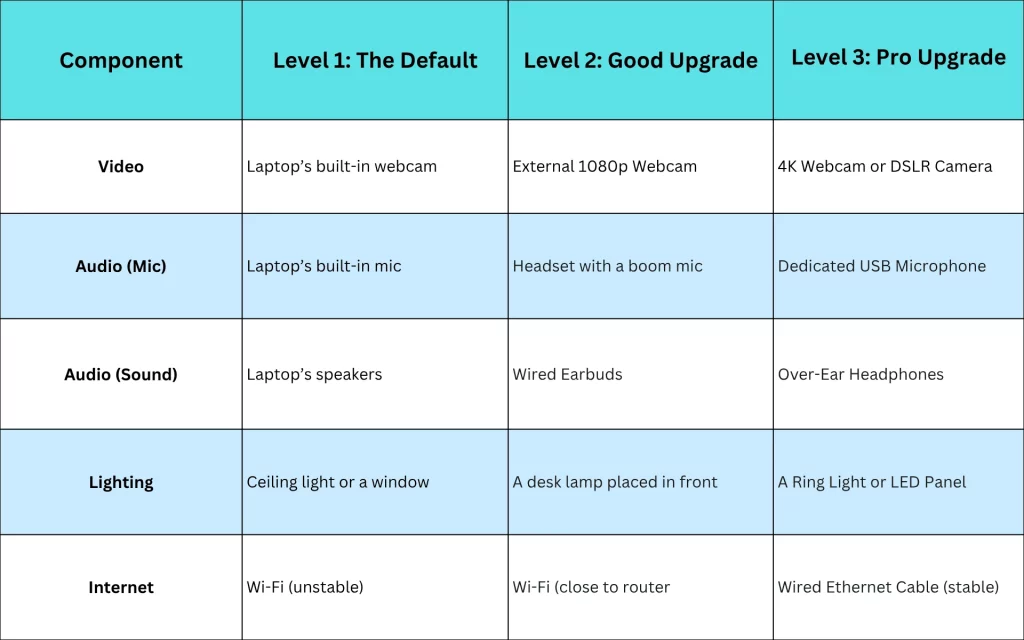
1. The Essential Hardware
This is the physical equipment you will use. For a home setup, this includes your camera, your microphone, and your audio output (headphones or speakers).
- A High-quality Webcam: Upgrading to an external webcam solves the two biggest video problems: angle and quality. Because the camera is separate, you can place it right at your eye level for a natural angle. More importantly, an external camera has a much better glass lens and a larger image sensor. This upgraded hardware can give you a clear, color-accurate picture where a built-in camera would make you look grainy or dark.
- Your Microphone: This is the most critical upgrade for improving how you sound. You don’t need a large, shared conference microphone designed for a boardroom. For a home office, a dedicated USB microphone is best because it solves the ‘distant audio’ problem. It is built to be sensitive to sound from one direction (your mouth) and to reject sounds from the sides and rear. This technology is excellent for a home office. It isolates your voice from the room’s echo and the distracting sounds of your keyboard typing.
- Your Speakers: Using your laptop’s open speakers is the main cause of audio feedback. The solution is to use headphones or earbuds. This simple step stops the feedback loop. It blocks out other distracting noises in your home, helping you stay focused on the meeting.
2. Your Lighting
Lighting is a key piece of your technical setup. You cannot rely on a window for all your meetings, as the sun moves and it gets dark. You also cannot rely on a ceiling light, which casts harsh shadows.
The upgrade here is a dedicated light source that you control. This is often called a “key light” and can be a small LED panel or a “ring light.” This tool provides a consistent, soft, and even light that shines on your face. Good lighting is a quality multiplier. It makes any camera, even a built-in one, look dramatically better.
3. A Stable Internet Connection
Your internet connection is the foundation of your entire setup. You can have the best camera and microphone in the world, but they are useless if your signal is choppy, robotic, or constantly freezes.
In a home environment, you are almost always sharing your internet connection. You are competing for bandwidth with other people who might be streaming movies or playing games. This competition can make your Wi-Fi connection unstable. The best “upgrade” is to use a wired Ethernet cable. A cable provides a stable, fast connection that does not drop. If you must use Wi-Fi, the best solution is to move as close to your router as possible.
4. Your Software and Drivers
Your software is the “brain” that runs your hardware. This part is not about buying new things, but about simple maintenance. First, you must keep your software updated. This applies to all types of video conferencing apps you use.
Second, you must make sure your computer’s drivers are up to date. Drivers are the small pieces of software that tell your computer how to use your hardware, like your new webcam or microphone. An old driver can cause your new gear to freeze, crash, or not work at all.
Finally, you must know where to go in the software settings. After you plug in your new microphone, you have to tell your online conferencing platforms to use that new microphone. Learning this one setting is the final step to making your new hardware work.
7 Video Conferencing Tips and Tricks for Your Home Setup
Buying these video meeting tools is only half the job. If you want to get the most out of your home environment video conferencing setup, you need to use them effectively. Here are 7 practical video conferencing tips and tricks for setting up your space:
- Upgrade Strategically: If your built-in laptop camera and microphone are failing you, the best solution is to upgrade. This does not mean you must buy the most expensive gear. It means you strategically replace the parts that cause problems. Buying a separate, purpose-built tool like a USB microphone or an external webcam is the most effective way to take full control of how you look and sound.
- Position Your meeting room camera for a Natural Conversation: Your main goal, as we discussed, is to get the camera to your eye level. If you are using your laptop, a laptop stand or a simple stack of books will work perfectly. If you have an external webcam, place it directly on top of your monitor, centered.
- Place Your Light to Create a Clear, Soft Image: You now have a dedicated light, like a ring light or an LED panel. Where you put it matters. Avoid placing the light too low, as this creates strange shadows. The best position is slightly above your camera and angled down at your face. This copies the way natural light works.
- Place Your Microphone to Capture Your Voice (And Nothing Else): Your new USB microphone is perfect at picking up your voice, but only if it is close to you. A good rule is to keep the microphone between 6 and 12 inches away from your face. This closeness allows you to turn the microphone’s sensitivity down.
- Soften Your Room to Reduce Echo: Your microphone will do most of the work, but your room can help. Just add soft materials to the room to absorb the sound. An area rug or curtains on a window, a full bookshelf, or even a few pillows on a hardwood floor make a huge difference.
- Create Depth in Your Background: The biggest mistake people make is sitting with their back pressed right against a wall. This looks flat and creates distracting shadows behind your head. Instead, position your desk in a way that there is at least three to five feet between your chair and the wall behind you. This separation makes the background slightly out of focus, which pulls the viewer’s attention to you.
- Use the “Blur” Feature as a Final Polish: Even with a great background, a home environment can be unpredictable. People may walk by, or it might just be a messy day. This is where you try the simple “background blur” feature. This feature uses software to blur everything behind you, just like a professional camera would.
Your Final Takeaway: Build Your Setup One Step at a Time
The final takeaway is that a great video conferencing setup is not about chasing expensive video conferencing trends. It is a system. Your professionalism on a call comes from how all the pieces work together in your home environment. But building this system does not mean you have to buy everything today.
The most important idea to remember is that even one small change can make a huge difference. A professional video conferencing call setup is built one step at a time. It is about making smart, targeted upgrades that make your meetings better. The goal is to be clearer and more professional today than you were yesterday.
Build Your Best Home Meeting Setup with PeopleLink
You now have the complete information for building a professional home setup. You know the exact components you need to upgrade. But finding all the right pieces can be a challenge. This is where PeopleLink can help, We are an end-to-end provider for audio and video conferencing. We provide all the tools you need to turn any room into a professional meeting space all under one roof. Let us help you build the reliable setup you need to look and sound your best.
FAQ's
What equipment do I need for a home video conferencing setup?
At a minimum, you need a good webcam, a dedicated microphone, and headphones. Headphones are key because they stop all audio feedback. We also strongly suggest a dedicated light, like a ring light, to make your video clear.
How do I improve video quality during calls?
The best way to improve video quality is to add more light. Place a lamp or ring light in front of you, shining on your face. This helps your camera see you clearly. If your video is still grainy, your next step is to upgrade from the built-in laptop camera to an external webcam.
Which webcam is best for home meetings?
You do not need the most expensive model. The “best” webcam is any external webcam that provides at least 1080p resolution. This gives you a sharp, clear picture and is a huge upgrade over any built-in laptop camera.
How do I fix blurry or lagging video during meetings?
Blurry or grainy video is usually a lighting problem. Fix this by adding a light in front of your face. Lagging, freezing, or “robotic” video is an internet problem. The best fix is to plug your computer directly into your router with a wired Ethernet cable.
Which video conferencing app is best for home use?
Most popular apps like Zoom, Microsoft Teams, or inMeet are all excellent. The app itself is less important than your setup. Our guide helps your camera and microphone look and sound great on any platform you use.